


News
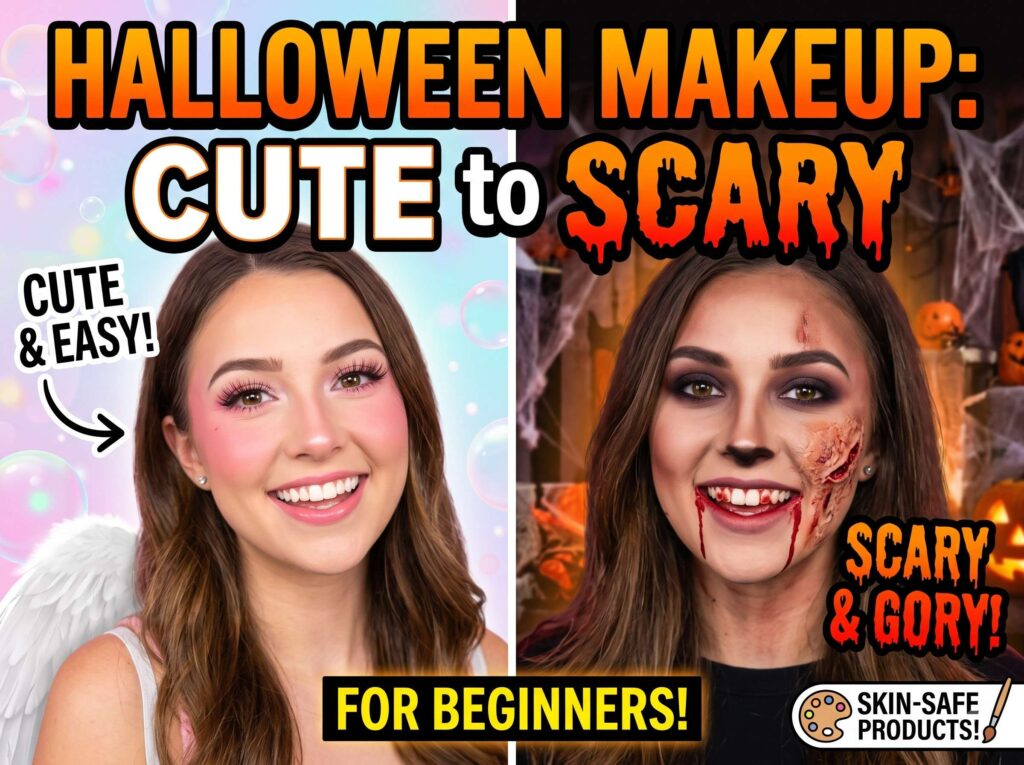
The Ultimate Beginner’s Halloween Makeup Tutorial: From ‘Cute’ to Scary
Jul
Halloween is the one time of the year when the rules of everyday beauty are completely thrown out the window. Whether you want to channel your inner ethereal being, look like a porcelain doll that has come to life, or terrify your neighbors as a blood-soaked zombie, your face is the ultimate canvas. However, if you are a beginner, the world of Halloween makeup—especially special effects (SFX) and face paint—can feel incredibly intimidating.
When you scroll through Instagram or TikTok in October, you are bombarded with professional makeup artists creating mind-bending optical illusions and hyper-realistic gore. But what if you just bought your first eyeshadow palette? What if you want a look that is impressive but doesn’t require a degree in prosthetics?
Welcome to the ultimate Halloween makeup tutorial designed explicitly for beginners. In this comprehensive, step-by-step guide, we are going to walk through the entire spectrum of Halloween beauty. We will start on the gentle, “cute” side of the spectrum with heavenly angels and creepy-cute dolls. Then, we will slowly turn down the lights and transition into the “scary” territory, teaching you foolproof ways to create realistic bruises, easy wound effects, and DIY fake blood.
Most importantly, we will focus on using skin-safe products and accessible tools. You don’t need a massive professional kit to look amazing. Grab your brushes, your sponges, and let’s dive into the ultimate Halloween transformation!
Part 1: The Foundation – Prep, Prime, and Skin-Safe Products
Before we apply a single drop of fake blood or white face paint, we need to talk about the most crucial step of any Halloween makeup look: protecting your skin. Halloween makeup, especially heavy creams and theatrical paints, can be notoriously harsh on the skin, leading to clogged pores, breakouts, and allergic reactions.
1. The Importance of Skin Prep
When using heavy pigments, your skin needs a protective barrier. Start with a freshly cleansed face. Apply a hydrating, soothing moisturizer—ideally one with ingredients like ceramides or hyaluronic acid to plump the skin. Allow the moisturizer to sink in for at least ten minutes.
Next, you absolutely must use a primer. If you are using water-based face paints, opt for a water-based primer. If you are using cream or oil-based theatrical makeup, a silicone-based primer will help create a smooth, spackle-like barrier between the heavy makeup and your precious pores. This not only protects your skin but ensures the makeup lasts through hours of Halloween partying.
2. Choosing Skin-Safe Products
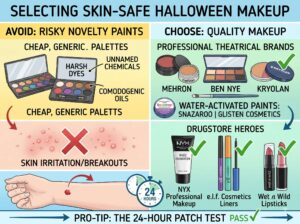
Do not buy cheap, novelty face paint from the local dollar store if you can avoid it. These often contain harsh dyes, unnamed chemicals, and comodegenic oils that will wreak havoc on your complexion. Instead, look for:
-
Theatrical Brands: Brands like Mehron, Ben Nye, and Kryolan formulate their products for actors who wear them every day. They are heavily pigmented but rigorously tested for skin safety.
-
Water-Activated Paints: Brands like Snazaroo or Glisten Cosmetics offer water-activated paints that go on smoothly and wash off easily with just soap and water, making them perfect for beginners and sensitive skin.
-
Drugstore Heroes: You don’t always need “costume” makeup. Brands like NYX Professional Makeup, e.l.f. Cosmetics, and Wet n Wild release phenomenal, skin-safe Halloween collections every year, including fantastic white foundations, vivid bright eyeliners, and deep, vampy lipsticks.
Pro-Tip for Beginners: Always perform a patch test! Apply a small amount of the makeup (especially reds and fake blood, which can stain or irritate) behind your ear or on your inner arm 24 hours before Halloween night to ensure you don’t have an allergic reaction.
Part 2: The ‘Cute’ Spectrum – Gentle & Ethereal Looks
Not everyone wants to look terrifying on Halloween. Sometimes, you want a look that is flattering, glamorous, and photogenic. Let’s start with two beginner-friendly, incredibly cute looks that rely on standard beauty products you probably already have in your makeup bag.
Look 1: The Ethereal Angel
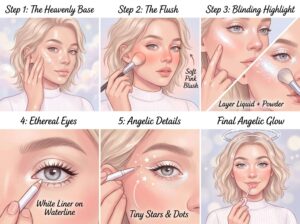
The Angel is a classic Halloween staple. This look focuses on glowing skin, soft pastel tones, and a blinding, heavenly highlight. It is gentle, incredibly flattering, and very hard to mess up.
What You Need:
-
A dewy foundation or BB cream.
-
Liquid and powder highlighters (the more, the better!).
-
White eyeliner pencil and white liquid liner.
-
Soft pink or peach blush.
-
Clear lip gloss.
-
Volumizing mascara or feathery false lashes.
Step-by-Step Tutorial:
-
The Heavenly Base: Apply your dewy foundation. You want your skin to look like glass. Conceal any blemishes, but avoid heavy, matte setting powders. Only powder your T-zone if absolutely necessary.
-
The Flush: Apply a generous amount of soft pink blush to the apples of your cheeks, blending it upwards towards your temples and lightly across the bridge of your nose for a youthful, cherubic flush.
-
Blinding Highlight: This is where the magic happens. Take a liquid illuminator and apply it to your cheekbones, the tip of your nose, your cupid’s bow, and your brow bone. Once that dries, top it with an icy white or holographic powder highlighter. You want to reflect light from every angle.
-
Ethereal Eyes: Sweep a wash of pale, shimmery eyeshadow (champagne or icy blue) across your lids. Take your white eyeliner pencil and heavily line your lower waterline to make your eyes look wide and innocent.
-
The Angelic Details: Use your white liquid liner to draw tiny, delicate stars or dots around your temples and the outer corners of your eyes. This adds a magical, fairy-tale element to the look.
-
Finishing Touches: Brush your eyebrows up with a clear brow gel for a feathery look. Apply two coats of mascara (or fluttery, natural-looking false lashes). Finish with a generous layer of high-shine clear or pale pink lip gloss. Add a halo headband, and you are ready!
Look 2: The Creepy-Cute Babydoll
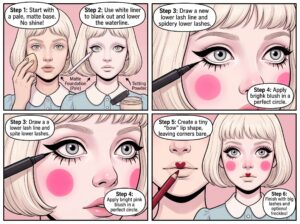
The Babydoll look bridges the gap between cute and slightly unsettling. It relies on manipulating the proportions of your face to look incredibly round, wide-eyed, and plastic, reminiscent of a vintage porcelain doll.
What You Need:
-
A full-coverage, matte foundation (one shade lighter than your natural skin tone).
-
Matte setting powder.
-
White pencil eyeliner and black liquid eyeliner.
-
Vibrant pink blush.
-
Deep red or pink lipstick.
-
Heavy, spidery false lashes.
Step-by-Step Tutorial:
-
The Porcelain Base: Apply a full-coverage, matte foundation. To achieve that doll-like appearance, use a shade slightly paler than your actual skin tone. Set your entire face generously with a matte powder. You want zero shine—dolls are made of porcelain or plastic, not human skin.
-
The Doll Eyes (The Illusion): This is the most crucial step. To make your eyes look massive, apply white pencil eyeliner to your lower waterline, but bring it down slightly onto your skin beneath your lower lashes. This creates a new, lower boundary for your eye.
-
Defining the New Eye: Take your black liquid liner and draw a subtle line underneath the white pencil you just applied. This acts as your “new” lower lash line. Draw tiny, vertical, spidery lashes extending downward from this black line. On your upper lash line, apply a thick black wing.
-
Cheeks: Dolls have perfectly round, highly concentrated circles of blush. Smile, find the exact apple of your cheek, and apply a vibrant pink blush in a distinct circle. Do not blend it out too far towards your temples like you normally would.
-
The Bow Lips: Cover your natural lips with foundation to blank them out. Take a lip pencil and draw a tiny, exaggerated “heart” or “bow” shape in the very center of your lips. Fill this shape in with your vibrant red or pink lipstick, leaving the outer corners of your natural lips bare.
-
Faux Freckles (Optional): Use a light brown brow pencil to dot a few symmetrical freckles across the bridge of your nose and upper cheeks. Add spidery false lashes to your upper lash line to complete the doll illusion.
Part 3: Transitioning to the Dark Side – The Basics of Spooky Makeup
If you want to take your look from “cute” to “spooky” without diving fully into gore, you need to master the art of looking unwell, fatigued, and haunted. You can apply these techniques to almost any costume (a dead cheerleader, a vampire, a ghost, or a zombie).
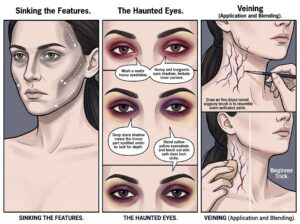
1. Sinking the Features
To look spooky, you want to reverse standard contouring. Instead of lifting the face, we want to hollow it out. Use a matte, cool-toned contour powder (or a matte grey/taupe eyeshadow) to aggressively contour the hollows of your cheeks, bringing the shadow lower down towards your jawline to look gaunt. Hollow out your temples and the sides of your nose.
2. The Haunted Eyes
The easiest way to look immediately scary is to create deep, sickly dark circles.
-
The Colors: Do not just use black eyeshadow; it will look like a messy smokey eye. Instead, use a mix of matte purple, deep red, and sallow yellow eyeshadows.
-
The Technique: Start with a wash of red or burgundy around the entire eye, focusing on the inner corner and underneath the eye. Then, add a touch of purple to the deepest part of your eye socket. Finally, blend a tiny bit of sickly yellow around the edges to mimic a healing bruise.
3. Veining
Drawing subtle, sickly veins adds an incredible level of terrifying detail. Use a tiny, fine-tipped brush and water-activated face paint (or liquid eyeliner) in shades of dark blue, purple, and deep red.
-
Lightly trace wiggly, branching lines under your eyes, down your neck, or across your collarbones.
-
Beginner Trick: Once you draw the veins, lightly tap over them with a makeup sponge that has a tiny bit of foundation on it. This pushes the veins “underneath” the skin, making them look terrifyingly realistic rather than just painted on.
Part 4: The ‘Scary’ Spectrum – Gore & Special Effects for Beginners
Now we enter the realm of true Halloween horror. If you want to terrify people, you need to learn how to create wounds, scabs, and blood. Many tutorials suggest using Liquid Latex, but Liquid Latex can be highly allergenic (latex allergies are common), smells terrible, and is tricky for absolute beginners to manipulate.
Instead, we are going to use accessible, safer alternatives to create a stomach-churning masterpiece.
Technique 1: The Easy, No-Latex Fake Wound
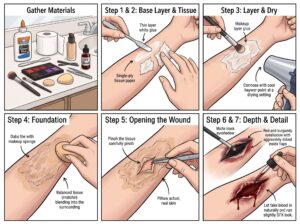
You can create incredibly realistic, peeling, open wounds using products you likely already have in your bathroom cabinet.
What You Need:
-
Non-toxic school glue (like Elmer’s) OR a clear, peel-off face mask. (Both are skin-safe and peel off easily).
-
Single-ply tissue paper or toilet paper.
-
Your regular foundation.
-
Matte eyeshadows (red, black, and purple).
-
Fake blood (store-bought or DIY).
Step-by-Step Tutorial:
-
The Base Layer: Decide where you want your wound (a cheek or forearm is easiest for beginners). Apply a thin layer of the non-toxic glue or peel-off face mask to the area.
-
The Tissue: Rip a small piece of single-ply tissue paper (make sure the edges are jagged and torn, not cut with scissors). Press the tissue flat into the wet glue.
-
Layering: Apply another layer of glue over the tissue, and add one more piece of torn tissue. Smooth down the outer edges into your skin using your fingers or a spatula, but leave the center a bit textured. Let this dry completely (you can use a hairdryer on the cool setting to speed this up).
-
Fleshing it out: Once completely dry and hardened, use a makeup sponge to dab your regular liquid foundation over the entire tissue area, blending the edges into your natural skin. Now it looks like a strange, raised patch of skin.
-
Opening the Wound: Carefully pinch the center of the dried tissue and use tweezers (or your fingers) to rip a hole in the middle, tearing it open to reveal your real skin underneath. Peel the edges back slightly. You have just created the flaps of an open wound!
-
Coloring the Inside: Take a small brush and pack matte black eyeshadow into the very deepest part of the torn hole to create depth. Next, aggressively dab deep red and burgundy eyeshadow all over the inside of the wound and along the torn skin flaps to make it look raw and irritated.
-
The Gore: Finally, take a generous amount of fake blood and drip it into the center of the wound, letting it naturally run down your face or arm.
Technique 2: Mastering Fake Blood
Fake blood is the cherry on top of any scary Halloween look. While you can buy great skin-safe fake blood at spirit stores (look for brands like Mehron Squirt Blood or Stage Blood), you can easily make an edible, skin-safe version at home.
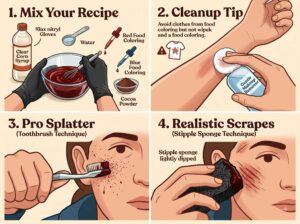
The Ultimate DIY Fake Blood Recipe:
-
1/2 cup Clear Corn Syrup (provides the sticky, thick texture).
-
1 tablespoon Water (to thin it out slightly).
-
10-15 drops Red Food Coloring.
-
1-2 drops Blue or Green Food Coloring (crucial step: red alone looks too bright and fake; blue/green deepens it to an oxidized, realistic venous blood color).
-
A pinch of Cocoa Powder (adds opacity and grittiness).
Mix all ingredients in a bowl until you reach your desired consistency and color.
Note: Food coloring can temporarily stain the skin, so ensure you have a good makeup remover for the next day, and avoid getting it on your favorite clothes!
How to Apply Blood Like a Pro: Don’t just smear it everywhere with your hands. For realistic blood spatter, take a stiff-bristled toothbrush, dip it in the fake blood, hold it near your face, and pull your thumb back across the bristles to flick tiny, realistic speckles of blood across your cheeks and forehead. For scrape wounds, buy a cheap “stipple sponge” (a highly textured, porous black sponge found in costume shops). Dip it lightly in thick fake blood and drag it roughly across your forehead or cheek to create instant, realistic road-rash scratches.
Part 5: Post-Halloween – The Safe Way to Remove Heavy Makeup
After a long night of haunting, dancing, and eating candy, the last thing you want to do is scrub your face aggressively. Heavy Halloween makeup, layers of glue, and fake blood require a strategic approach to removal to avoid waking up on November 1st with angry, breakout-prone skin.
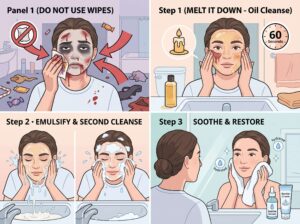
Do NOT just use a makeup wipe. A standard wipe will only smear fake blood and heavy pigments around, pushing them deeper into your pores.
The Double Cleansing Method:
-
Melt it Down: Start with a rich, oil-based cleansing balm or a liquid cleansing oil. If you don’t have one, coconut oil or baby oil works wonders in a pinch for heavy theatrical makeup. Massage the oil into your dry face for a full 60 seconds. The oil will break down the silicone primers, the heavy waxes in the face paint, and the sticky residue of fake blood.
-
Emulsify and Rinse: Add a little warm water to your hands and massage again (the oil should turn milky). Rinse thoroughly with warm water.
-
The Second Cleanse: Follow up immediately with your regular water-based gel or foaming facial cleanser to wash away the oil and any remaining traces of makeup.
-
Soothe: Pat your face dry with a clean towel. Apply a soothing, hydrating serum and a thick layer of moisturizer to repair your skin barrier.
(Pro-Tip for stubborn food-coloring stains: If you have a faint pink stain left behind from red face paint or DIY blood, gently massage a little bit of shaving cream or a mix of baking soda and water over the area, leave for a minute, and rinse).
Conclusion: Embrace Your Inner Artist This Halloween
Halloween makeup is the ultimate playground for creativity. Whether you decide to start small with the shimmering highlights of a heavenly angel, play with proportions for a creepy babydoll, or dive headfirst into the gruesome, thrilling world of DIY wounds and fake blood, the most important rule is to have fun.
Remember, perfection is not the goal here. If your fake wound looks a little messy, that just makes it look more realistic! If your doll eyeliner is slightly smudged, it just adds to the creepy, haunted aesthetic. By using these beginner-friendly techniques, prioritizing skin-safe products, and giving yourself a little time to practice before the big night, you will undoubtedly turn heads at your Halloween event.
Which end of the spectrum are you leaning towards this year? Are you staying Cute or going full Scary? Let us know in the comments below, and don’t forget to pin this tutorial for your Halloween party prep!
Frequently Asked Questions (SEO FAQs)
Q: Can I use regular acrylic paint on my face for Halloween?
A: Absolutely NOT. Acrylic craft paints are not formulated for the skin. They can contain toxic pigments, cause severe allergic reactions, and seal the skin, trapping heat and sweat. Always use makeup or paints specifically labeled as cosmetic-grade or skin-safe.
Q: How do I stop my Halloween makeup from creasing and sweating off?
A: Preparation and setting are key. Always use a primer suited for your makeup type (silicone primer for cream/oil makeup). Once your makeup is done, set cream products with a translucent setting powder, and lock the entire face down with a high-quality, long-lasting setting spray.
Q: How can I make my fake wound look older and infected?
A: To make a wound look old rather than fresh, use less bright red blood and more dark, coagulated blood (add more cocoa powder to your DIY mix). Stipple a little bit of sallow yellow and pale green matte eyeshadow around the edges of the wound to simulate bruising and infection.
